Step 6: Set the Spring XML
To integrate the Spring Framework into a web application we have to add the definition of the Spring dispatcher servlet to the web.xml configuration file and to configure that servlet using another xml configuration file.
Open the web.xml file (under Web Pages > WEB-INF) in a text editor (by right clicking and selecting Edit or by double click and then moving to the XML tab in the editor window). Use copy and paste to replace the default content of the web.xml file with the following new content:
<?xml version="1.0" encoding="UTF-8"?>
<web-app version="2.5" xmlns="http://java.sun.com/xml/ns/javaee"
 xmlns:xsi="http://www.w3.org/2001/XMLSchema-instance"
 xsi:schemaLocation="http://java.sun.com/xml/ns/javaee
 http://java.sun.com/xml/ns/javaee/web-app_2_5.xsd">
  <servlet>
    <servlet-name>spring</servlet-name>
    <servlet-class>
      org.springframework.web.servlet.DispatcherServlet
    </servlet-class>
    <load-on-startup>2</load-on-startup>
  </servlet>
  <servlet-mapping>
    <servlet-name>spring</servlet-name>
    <url-pattern>*.html</url-pattern>
  </servlet-mapping>
    <session-config>
    <session-timeout>
      30
    </session-timeout>
    </session-config>
    <welcome-file-list>
        <welcome-file>index.jsp</welcome-file>
    </welcome-file-list>
</web-app>
The settings above routes web requests with .html suffix to the Spring dispatcher servlet.
Additional spring configuration is set in another XML file (whose name is derived from the name of the Spring dispatcher servlet in web.xml). To generate that file:
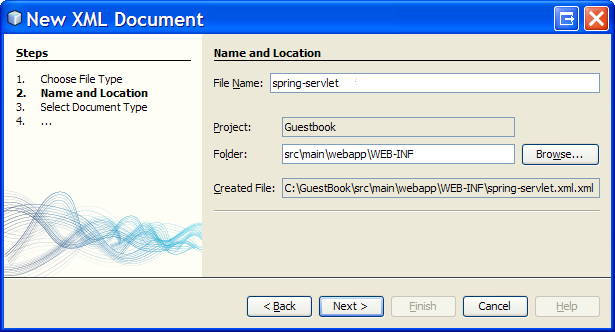
- Right click the WEB-INF node in the [Projects] window, select New > Other... and then choose the XML category, XML Document and click Next.
- Enter spring-servlet as the File Name.
- The Folder should be src\main\webapp\WEB-INF.
- Click Next and then Finish to create the XML file.
 Now use copy and paste to replace the content of the
 spring-servlet.xml file with the following new content:
<?xml version="1.0" encoding="windows-1252"?>
<beans xmlns="http://www.springframework.org/schema/beans"
       xmlns:xsi="http://www.w3.org/2001/XMLSchema-instance"
       xmlns:p="http://www.springframework.org/schema/p"
       xmlns:context="http://www.springframework.org/schema/context"
       xmlns:mvc="http://www.springframework.org/schema/mvc"
       xmlns:aop="http://www.springframework.org/schema/aop"
       xmlns:tx="http://www.springframework.org/schema/tx"
       xsi:schemaLocation="
       http://www.springframework.org/schema/beans
       http://www.springframework.org/schema/beans/spring-beans-3.0.xsd
       http://www.springframework.org/schema/context
       http://www.springframework.org/schema/context/spring-context-3.0.xsd
       http://www.springframework.org/schema/mvc
       http://www.springframework.org/schema/mvc/spring-mvc-3.0.xsd
       http://www.springframework.org/schema/aop
       http://www.springframework.org/schema/aop/spring-aop-3.0.xsd
       http://www.springframework.org/schema/tx
       http://www.springframework.org/schema/tx/spring-tx-3.0.xsd">

  <!-- Use @Component annotations for bean definitions -->
  <context:component-scan base-package="guest"/>

  <!-- Use @Controller annotations for MVC controller definitions -->
  <mvc:annotation-driven />

  <!-- Add JPA support -->
  <bean id="emf" class=
       "org.springframework.orm.jpa.LocalContainerEntityManagerFactoryBean">
     <property name="loadTimeWeaver">
        <bean class=
 "org.springframework.instrument.classloading.InstrumentationLoadTimeWeaver"/>
      </property>
  </bean>

  <!-- Add Transaction support -->
  <bean id="myTxManager"
     class="org.springframework.orm.jpa.JpaTransactionManager">
        <property name="entityManagerFactory" ref="emf"/>
  </bean>

  <!-- Use @Transaction annotations for managing transactions -->
  <tx:annotation-driven transaction-manager="myTxManager" />

  <!-- View resolver -->
 <bean class=
     "org.springframework.web.servlet.view.InternalResourceViewResolver">
   <property name="prefix" value="/WEB-INF/"/>
 </bean>

</beans>
The settings above guides Spring to support annotations (for components, controllers and transactions), to inject a JPA EntityManager, to manage transactions and to look for JSP pages in the WEB-INF directory.
The next step (and the last in this tutorial) is running the Spring web application.