Database Explorer
The ObjectDB Database Explorer is a GUI tool for managing ObjectDB databases. You can use it to view data, execute JPQL and JDOQL queries, and edit database content.
Running the Explorer
The ObjectDB Explorer is packaged in the explorer.jar executable file, which is located in the bin directory of your ObjectDB installation. It depends on the objectdb.jar file.
You can run it from the command line as follows:
$ java -jar explorer.jar
If explorer.jar is not in the current directory, you must specify the path to the file.
Alternatively, you can run the Explorer by double-clicking explorer.jar. On Windows, you can also run explorer.exe. On Unix or Linux, you can run explorer.sh after editing the file to set the paths to objectdb.jar and the JVM.
Connecting to the database
Opening a database connection
To open a local database file in embedded mode, use the File > Open Embedded... command and select the file.
To open a database in client-server mode, select File > Open C/S Connection... and provide the host, port, username, and password for the connection. You must also specify a database path on the server, which you can do by using the Browse button.
You can also open recently used databases from the File > Recent Connections menu. By default, the Explorer automatically tries to connect to the most recently used database on startup.
Tabbed windows
When a database is open, three tabbed windows appear on the left side of the Explorer:
- The Database window is split into two sub-windows. The top sub-window displays general information about the database, and the bottom sub-window displays a list of bookmarked entities.
- The Schema window shows the user-defined persistable types (entity and embeddable classes) in the database and their persistent fields and indexes.
- The Query window lets you run JPQL and JDOQL queries, as discussed later.
Closing a database connection
To close the current database connection, use the File > Close command.
Viewing database content
Viewer windows
The Explorer provides two types of viewer windows for database data.
The Table window follows the approach of traditional visual database tools. Each row represents an object, each column represents a persistent field, and each cell contains the value of a field for a specific object. This type of viewer is useful for viewing data in a simple object model.
In most cases, the Tree window, which is designed to handle more complex object models, is preferred. The Tree window displays objects as a tree. Each database object is a tree node, and its persistent fields are its child nodes. This view makes navigation easier. Because references between database objects are represented as parent-child relationships, you can navigate between objects by expanding nodes, similar to exploring objects in a visual debugger. Note that the same database object can be accessed through different paths and can therefore be represented by more than one node. To help identify circular references, a special {R} (recursive) marker appears next to any object that is already present at a higher level in the same tree path (that is, the object is an ancestor of itself).
To open a new viewer window, either write a query in the Query window or select an element to view (such as an entity class in the Schema window, a bookmark in the Database window, or an object in an open Table or Tree window). You can open a new viewer window by using the Window > Open Tree Window and Window > Open Table Window commands. If the target element is an object in an open viewer window, the Window > Focus Selection command switches the current viewer to focus on that object.
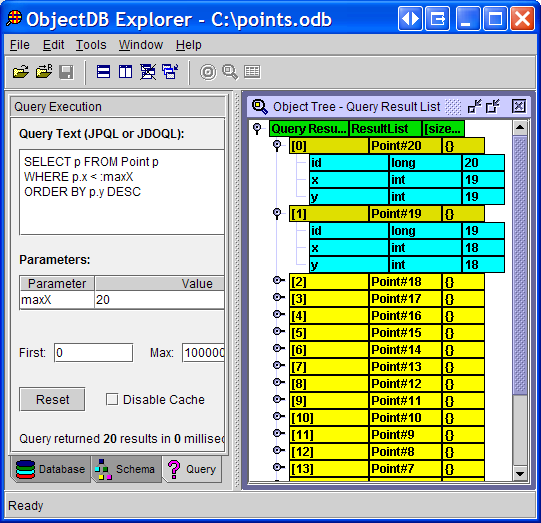
Executing queries
The Query window on the left lets you execute JPQL and JDOQL queries.
To execute a query:
- Enter a query string.
- In the Parameters table, provide arguments for any parameters. Specify an entity by its type and primary key, separated by a hash symbol (
#), for example,Point#1. Specify a collection as a comma-separated list of elements. - Use the First and Max fields to set the result range.
- Select the Disable Cache checkbox to bypass the query program and result caches.
- Click the Execute button to run the query.
If the query is valid, the results open in a default viewer (Tree window by default). The query window then displays the size of the result collection and the query execution time. If the query compilation fails, an error is displayed in the query window, and no viewer window is opened. You can also execute a query by using the Window > Open Tree Window or Window > Open Table Window commands to specify the viewer window type for the results.
At the bottom of the query window, a log panel displays the execution plan for the selected query. This is useful, for example, for checking which indexes are used.
The Reset button clears the content of all fields in the window.
Refreshing the cache
When a database is open in client-server mode, other applications can access it simultaneously. If another process modifies the database, the Explorer's viewer windows might display outdated, cached content. To update the view, use the File > Refresh Data command to refresh the cache and the viewer windows.
Using bookmarks
To bookmark an entity for easy access, select it in a viewer window, use the Tools > Bookmark... command, specify a name, and click OK. You can access bookmarked entities from the Database window.
Editing database content
The Explorer is primarily a database viewer, but it can also function as an editor.
New entities
To create and store new entities, open the Create New Entities dialog box by using the Edit > New Entities... command. In the dialog box, select the entity class and specify the number of objects to create. Click the Create and Persist button to create and store the new entities.
Editing values and references
You can edit simple field values inline in the Tree and Table viewer windows. Double-click the field, press F2, or type the new value. Use the Edit > Edit Multi Line String command to edit a multiline string.
Reference fields can be edited by using the following commands:
- Use Edit > Set Reference > Set to Null to set a reference to
null. - Use Edit > Set Reference > Set to Existing Entity... to set a reference to an existing entity. You must specify the object by its type and primary key, separated by a hash symbol (
#), for example,Point#1. - Use Edit > Set Reference > Set to New Object... to set a reference to a new object, which does not have to be an entity.
Field values can also be set by using standard clipboard commands (Cut, Copy, and Paste). For example, you can select an entity in any viewer window, copy it as a reference to the clipboard, and then paste it onto a reference field to set its value.
The behavior of the Edit > Delete command depends on the context. If you delete a reference field, its value is set to null, and the referenced entity is not deleted. However, if you delete an entity that is a child of an Extent node in a viewer window, the object itself is deleted from the database.
Editing collections
Elements can be added to collections by using the following commands:
- Use Edit > Add to Collection > Add Null to add a
nullvalue. - Use Edit > Add to Collection > Add Existing Entity... to add a reference to an existing entity. You must specify the object by its type and primary key, separated by a hash symbol (
#), for example,Point#1. - Use Edit > Add to Collection > Add New Object... to add a reference to a new object, which does not have to be an entity.
To remove elements from a collection, use the Edit > Delete command.
To change the order of elements in an ordered collection, use the Edit > Move Element commands.
Saving changes
The Explorer manages an active transaction for each open database file. All editing operations are part of the active transaction. The File > Save command commits the transaction, applying all changes to the database. The File > Discard Changes command rolls back the transaction, discarding all changes. After you use File > Save or File > Discard Changes, the Explorer automatically begins a new transaction for the next editing session.
Options and settings
You can configure the Explorer's settings in the Options dialog box, which you can open by using the Tools > Options... command.
The Options dialog box has three tabs: General, Fonts, and Views.
The General tab
The General tab contains the following settings:
- The Encoding combo box is useful if strings in the database are not Unicode-encoded. ObjectDB stores
Stringinstances in the database by using the same encoding that they have in memory, which is usually Unicode. If you storeStringinstances in the database that have a different memory representation, you must set that encoding to manage these strings in the Explorer. This setting affects only the Explorer. In your applications, retrievedStringinstances always have the same encoding they had when they were persisted. - The Automatically open recently used database at startup checkbox specifies whether to open the most recently used database when the Explorer starts.
- The Table (instead of Tree) as a default viewer window checkbox specifies whether to use Table windows instead of Tree windows as the default viewer.
- The Darker colors for open branches in Tree windows checkbox specifies whether to use different colors for open and closed nodes in Tree windows.
- The Classpath for persistent classes and metadata field specifies a path for locating persistent classes and XML metadata. This field is optional; you can browse and edit ObjectDB database files even when class and metadata files are unavailable. However, some Explorer features require the classpath to be set. For example, the Explorer can only execute queries that include user-defined methods if the code for those methods is available on the specified classpath.
The Fonts tab
The Fonts tab is used to customize the appearance of different Explorer components. Select one or more elements on the left side, and then use the combo boxes on the right side to choose the font face, font size, font style, background color, and foreground color. Click the Reset button to apply the default settings to the selected elements. To discard all changes and apply the default settings to all elements, click the Reset All button.
The Views tab
On the Views tab, you can select which persistent fields appear in the viewer windows and in what order. This is useful when working with classes that have many fields, which can be difficult to display (for example, in a table viewer row).
There are three views: Table View, Tree View, and Summary. The Table View determines which fields from each persistent class are displayed as columns in Table viewer windows. The Tree View determines which fields are displayed as child nodes when you browse persistent objects in Tree viewer windows. The Summary view, also used by the Tree viewer, determines which fields are displayed as a summary in the node that represents the object.
The Table View and Tree View are initialized to show all persistent fields, but the Summary view is initially empty. Therefore, unless you configure it, persistent objects are presented in the Tree viewer with an empty field summary ({}).
To configure a view for a class, first select one of the three views, and then select the persistable class from the list. You can change the visibility of the class's persistent fields in the selected view by using the left and right arrow buttons to move fields between the Shown Fields and Hidden Fields lists. You can change the order of the shown fields by using the up and down arrow buttons or the Field Ordering combo box. You can also configure a view for a class by right-clicking one of its instances in a Table or Tree viewer window and using the Set View context menu command.