Step 5: Add a JSP Page
In this step we will add the JSP that generates the guestbook HTML output:
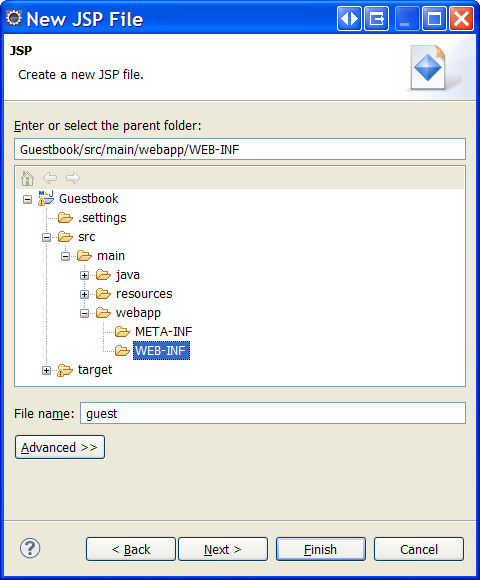
- Open the [New JSP File] dialog box by right clicking WEB-INF under src/main/webapp (in the [Package Explorer] window), selecting New > Other... > Web > JSP File and clicking Next.
- The parent folder should be WEB-INF (to prevent direct access to the JSP bypassing Spring).
- Enter guest as the jsp file name - use exactly that case sensitive class name.
- Click Finish to create the new JSP file.
 Now replace the content of the new jsp file with the following content:
<%@page contentType="text/html; charset=ISO-8859-1" pageEncoding="ISO-8859-1"%>
<%@page import="guest.*"%>

<jsp:useBean id="guestDao" type="guest.GuestDao" scope="request" />

<!DOCTYPE html PUBLIC "-//W3C//DTD HTML 4.01 Transitional//EN"
    "http://www.w3.org/TR/html4/loose.dtd">

<html>
    <head>
        <title>JPA Guestbook Web Application Tutorial</title>
    </head>

    <body>
        <form method="POST" action="guest.html">
            Name: <input type="text" name="name" />
            <input type="submit" value="Add" />
        </form>

        <hr><ol>
        <% for (Guest guest : guestDao.getAllGuests()) { %>
            <li> <%= guest %> </li>
        <% } %>
        </ol><hr>

        <iframe src="http://www.objectdb.com/pw.html?spring-eclipse"
            frameborder="0" scrolling="no" width="100%" height="30"> </iframe>
     </body>
 </html>
The JSP generates the guestbook page output, which contains a simple form for signing the guestbook, followed by a list of all the guests that have already signed (which are retrieved from the request's guestDao attribute that is set by the controller in the previous step).
The next step (and the last in this tutorial) is setting the Spring XML configuration.